2Desk Web to Lead feature allows you to build a web form based on lead fields and custom fields to place it on your website, landing page, etc, as an iframe.
The visitors can then enter their names, email addresses, upload attachments, and other basic information to create a lead directly in 2Desk.
To create new web to lead form, from the main admin menu, navigate to Setup -> Leads -> Web To Lead

Click on the button on the top left side New Form
NOTE: You will be able to build the form after you first create the initial form, including all the settings.
- Form Name – Give your form a descriptive name; it’s for internal use and will also appear in the lead’s profile when viewed.
- Language – The selected language is used only for validation messages.
- Submit button text – The label displayed on the submit button (e.g., ‘Request a Quote’ or ‘Contact Us’). Adjust it to suit your needs.
- Message to show after the form is successfully submitted – This message will be displayed after users successfully submit the form.
- Allow duplicate Leads to be inserted into a database? – Web-to-lead forms can sometimes create duplicate leads. 2Desk can prevent this by creating a task instead of inserting the lead directly into the leads database; the task will include all form data in the description. The assigned staff member can then review the data and take appropriate action.
- Source – Default lead source.
- Status – The status to assign to the lead after it is imported into the 2Desk database.
- Responsible – Automatically assign the lead to a specific staff member.
- Notification settings – Users will receive in-app notifications based on the selected notification types. Additionally, the responsible staff member will receive an email unless the ‘New Lead Assigned to Staff Member’ template is disabled in Setup->Email Templates.
- Recaptcha – Use Google reCAPTCHA to prevent spam. The Google reCAPTCHA field will appear only if you have previously configured the reCAPTCHA keys.
After you create the form, 2 new tabs will be shown in the form area: Form Builder and Integration Code.
- Form Builder – The place where you build the form and adjust all the fields you need.
- Integration Code is the code you will need to place into your website the form to be shown. Note that from the link, you will be able to see that each form has a unique key.
Building The Form
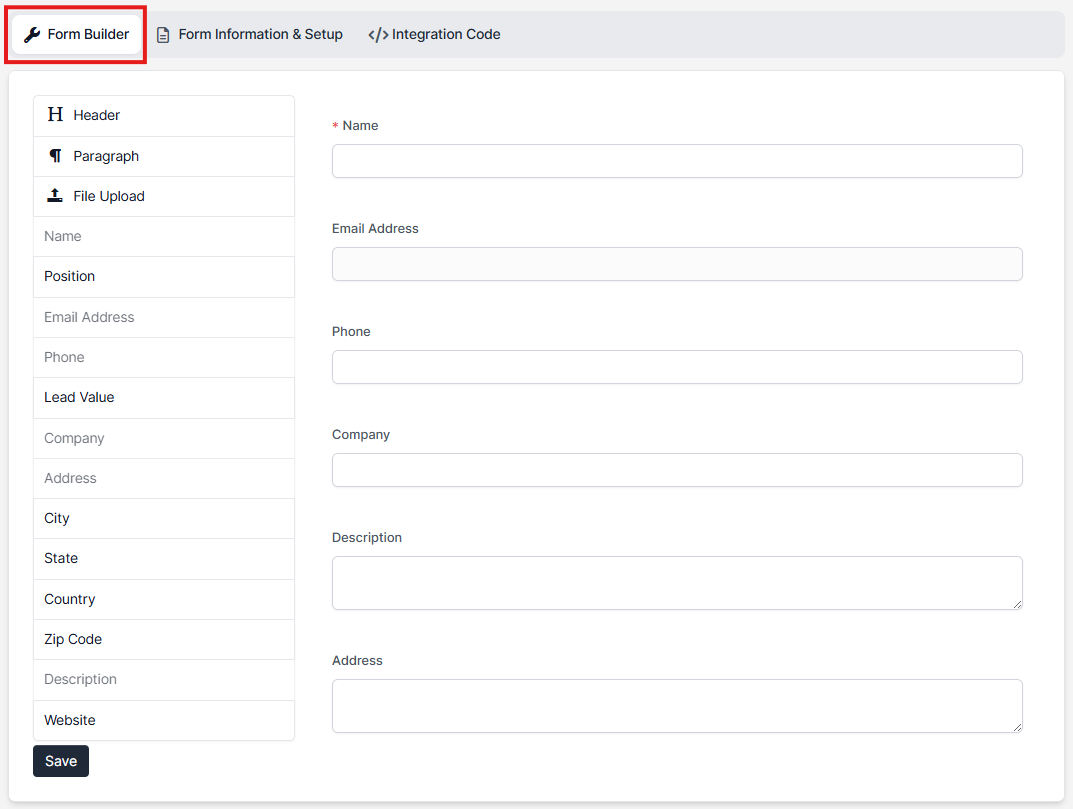
When you save the initial form settings, you will be automatically pointed on the Form Builder tab and on the left side, you will be able to see all the available form fields taken from the lead profile. Note that if you have custom fields for leads, you will be able to include your custom fields inside the form easy with drag and drop.
There is only 1 exception where the custom fields of type Hyperlink do not have support to be included in the web to lead form.
To add a field to the form just drag the field to the right side of the form area.
After you drag the field, you will be able to see on the left side that the dragging ability to this field will be disabled. You can only add the field in the form once to prevent confusion with the form data.
Customizing The Fields
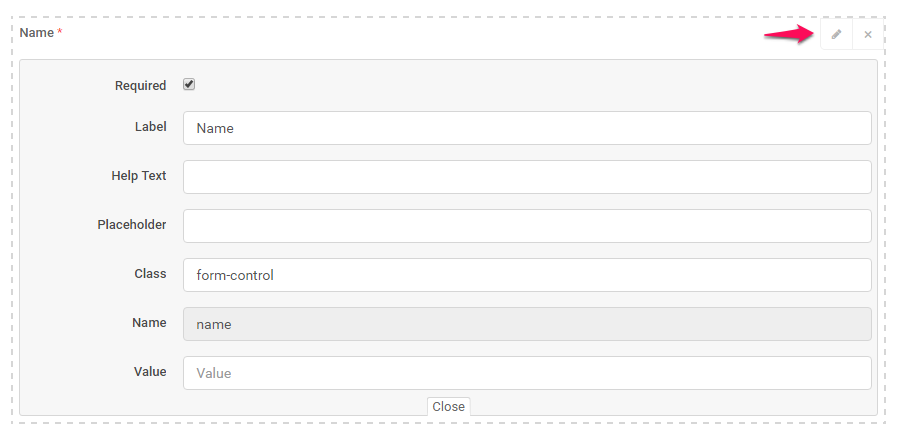
If the fields don’t fit exactly for your needs, you can customize the labels, add help text, placeholders and make them required. When you drag the field in the form area, just hover over the field on the top right side, and you will be able to see 2 buttons (edit and remove)
After you customize the form, click on the bottom left button Save, and click on the tab Integration Code to get the code you need to add to your website. The code will be placed as an iframe, and you can adjust the width and height directly to the code snippet provided by 2Desk.
Include the logo in the form
To include your company logo in the form, you can either share or embed the URL with a query string parameter as shown below:
https://you.com/forms/wtl/715d3e13cea500fc168faa4e3dcb8e24?with_logo=1
Direct link sharing
The forms can be shared directly to your customers without actually embedding the form on your website. This feature is useful, for example, if you want to include a link in emails, SMS, etc…
In order for 2Desk can know that the form link is shared directly and not embedded into an iframe, you need to specify the URL query string. In this case, 2Desk will provide better styling to the form.
https://you.com/forms/wtl/715d3e13cea500fc168faa4e3dcb8e24?with_logo=1&styled=1
Create Multi-Column Form Layouts in Web To Lead Form
By default, the form fields will be added in a single column full width of the document if you want to customize the form and have the fields displayed in multiple columns we have added the ability to achieve this with custom classes applied to the field, you can add up to 12 columns in 1 row.
In the following example, we will create 2 fields in 2 columns and 1 row.
Keep in mind that the columns won’t be applied in the form builder, only when the form is viewed by accessing the integration link or is in an iframe.
Here is a quick example:
Final result:
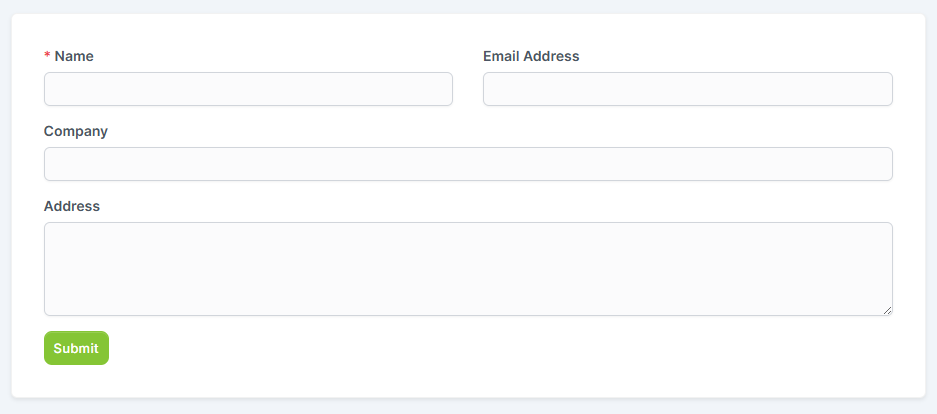
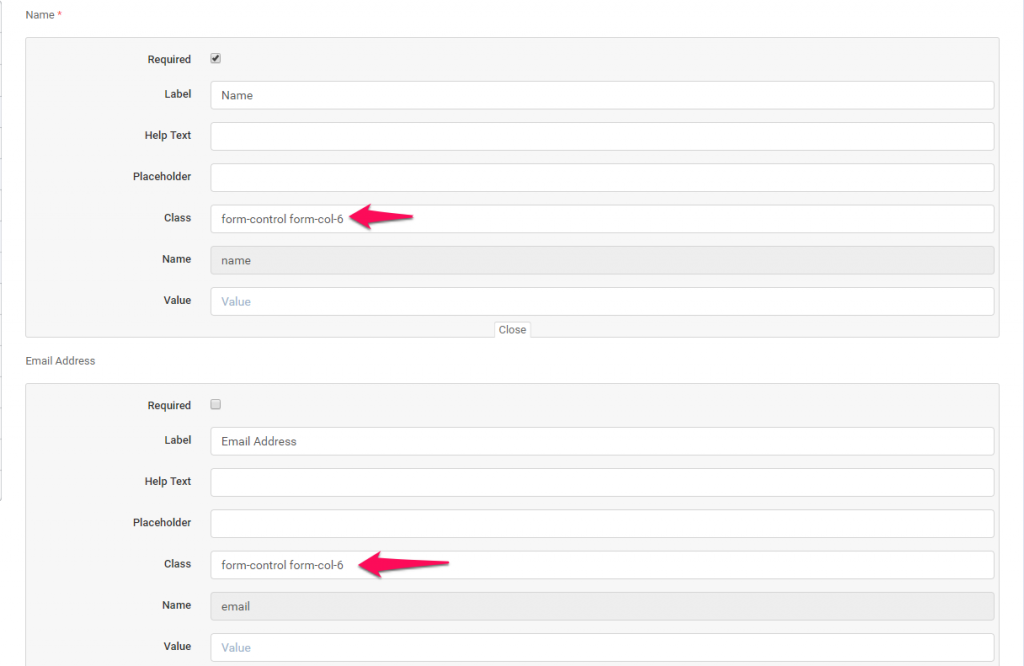
Assume that in your form builder you have 4 fields, as in order Name, Email Address, Company, Address.
For the first 2 fields, click on the EDIT button on the top right side of the field wrapper to slide down the edit area. In the class input, add a class for both fields form-col-6 as shown in the image below.
Save the form by clicking on the Save button, and preview the form from the integration link to see the final result.
As mentioned before, you can add up to 12 columns. In this case, form-col-6 + form-col-6 = 12, If you want to add 3 columns, apply the class form-col-4 on 3 fields (form-col-4*3 fields will be 12 and the fields will fit the document) that are one by one in order.
Few things to consider
- Never leave the form without required fields. By default, the name field will be required and it’s not recommended to uncheck as required.
- When placing the iframe snippet code there are few things you need to consider.
- If your Perfex CRM installation uses the HTTP protocol, load an HTTP page inside the iframe.
- If your Perfex CRM installation uses the HTTPS protocol, load an HTTPS page inside the iframe.
- In short: use matching protocols — embed an HTTP (non-SSL) Perfex CRM on an HTTP page and an HTTPS (SSL) Perfex CRM on an HTTPS page. You can read more about this here.